How to extend WooCommerce analytics reports
Introduction
This document serves as a guide to extending WC-Admin Reports with a basic UI dropdown, added query parameters, and modification of SQL queries and resulting report data. This example will create a currency selector for viewing the Orders Report based on a specific currency.
Getting started
We'll be using @woocommerce/create-woo-extension to scaffold a modern WordPress JavaScript environment for plugins. This tool creates a fully functional development environment for integrating with WooCommerce.
In this example, we'll be using the sql-modification variant to create a basic report extension that we can build upon.
In your wp-content/plugins directory, run the following command to create your extension:
npx @wordpress/create-block -t @woocommerce/create-woo-extension --variant=sql-modification my-extension-name
Navigate to the newly created folder and start development:
cd my-extension-name
npm run start
Optionally, you can use wp-env for a local WordPress environment:
npm -g i @wordpress/env
wp-env start
Don't forget to head over to /wp-admin/plugins.php and activate your plugin.
Populating test data
Next, set up some orders to have sample data. Using WooCommerce > Settings > Currency, I added three test orders in Mexican Peso, US Dollar, and New Zealand Dollar.
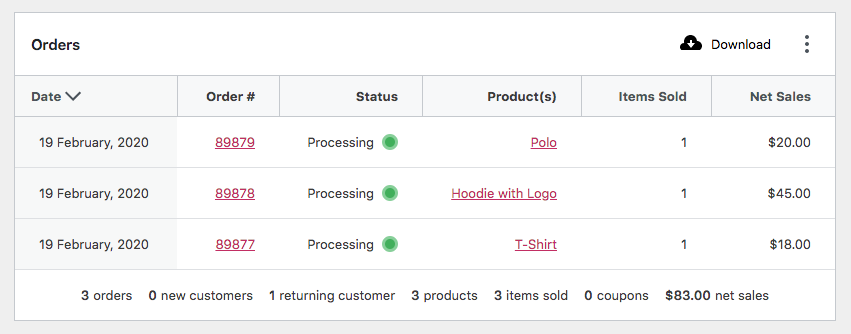
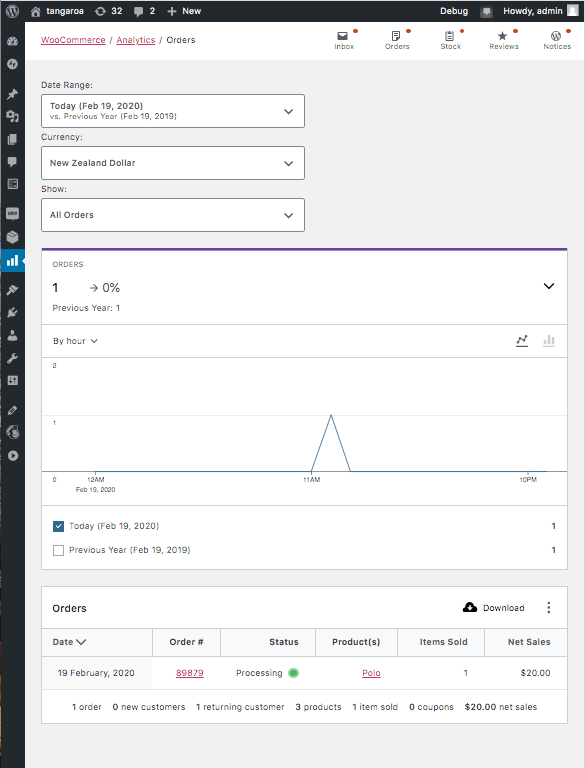
After doing so, check out WC-Admin to make sure the orders are showing up by going to /wp-admin/admin.php?page=wc-admin&period=today&path=%2Fanalytics%2Forders&compare=previous_year. Note that without any modification currency figures show according to what I have currently in WooCommerce settings, which is New Zealand Dollar in this case.
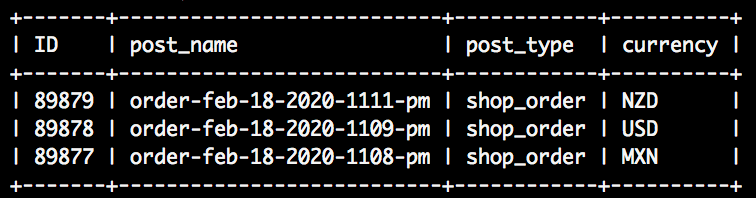
We can confirm each order's currency by running the following query on the wp_posts table and joining wp_postmeta to gather currency meta values. Results show an order in NZD, USD, and MXN. This query is similar to the one we'll implement later in the guide to gather and display currency values.
SELECT
    ID,
    post_name,
    post_type,
    currency_postmeta.meta_value AS currency
FROM `wp_posts`
JOIN wp_postmeta currency_postmeta ON wp_posts.ID = currency_postmeta.post_id
WHERE currency_postmeta.meta_key = '_order_currency'
ORDER BY wp_posts.post_date DESC
LIMIT 3
Add a UI dropdown
In order to view reports in differing currencies, a filter or dropdown will be needed. We can add a basic filter to reports by adding a configuration object similar to this one from the Orders Report.
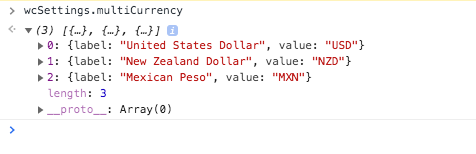
First, we need to populate the client with data to render the dropdown. The best way to do this is to add data to the wcSettings global. This global can be useful for transferring static configuration data from PHP to the client. In the main PHP file, add currency settings to the Data Registry to populate window.wcSettings.multiCurrency.
function add_currency_settings() {
	$currencies = array(
		array(
			'label' => __( 'United States Dollar', 'dev-blog-example' ),
			'value' => 'USD',
		),
		array(
			'label' => __( 'New Zealand Dollar', 'dev-blog-example' ),
			'value' => 'NZD',
		),
		array(
			'label' => __( 'Mexican Peso', 'dev-blog-example' ),
			'value' => 'MXN',
		),
	);

	$data_registry = Automattic\WooCommerce\Blocks\Package::container()->get(
		Automattic\WooCommerce\Blocks\Assets\AssetDataRegistry::class
	);

	$data_registry->add( 'multiCurrency', $currencies );
}

add_action( 'init', 'add_currency_settings' );
In the console, you can confirm the data has safely made its way to the client.
In index.js create the custom currency filter and add it the Orders Report.
import { addFilter } from "@wordpress/hooks";
import { __ } from "@wordpress/i18n";

const addCurrencyFilters = (filters) => {
  return [
    {
      label: __("Currency", "dev-blog-example"),
      staticParams: [],
      param: "currency",
      showFilters: () => true,
      defaultValue: "USD",
      filters: [...(wcSettings.multiCurrency || [])],
    },
    ...filters,
  ];
};

addFilter(
  "woocommerce_admin_orders_report_filters",
  "dev-blog-example",
  addCurrencyFilters
);
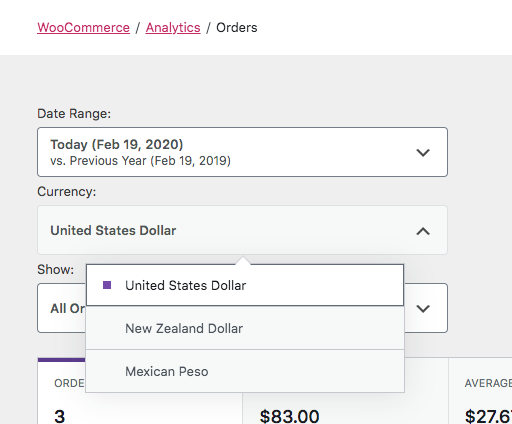
If we check out the Orders Report, we can see our new dropdown. Play around with it and you'll notice the currency query parameter gets added to the url. If you check out the Network tab, you'll also see this value included in requests for data used to populate the report. For example, see the requests to orders stats endpoint, /wp-json/wc-analytics/reports/orders/stats. Next we'll use that query parameter to adjust report results.
Handle currency parameters on the server
Now that our dropdown adds a currency query parameter to requests for data, the first thing we'll need to do is add the parameter as a query argument to the Orders Data Store and Orders Stats Data Store. Those data stores use query arguments for caching purposes, so by adding our parameter we can be sure a new database query will be performed when the parameter changes. Add the query argument in your main PHP file.
function apply_currency_arg( $args ) {
	$currency = 'USD';

	if ( isset( $_GET['currency'] ) ) {
		$currency = sanitize_text_field( wp_unslash( $_GET['currency'] ) );
	}

	$args['currency'] = $currency;

	return $args;
}

add_filter( 'woocommerce_analytics_orders_query_args', 'apply_currency_arg' );
add_filter( 'woocommerce_analytics_orders_stats_query_args', 'apply_currency_arg' );
Now that we're sure a new database query is performed on mutations of the currency query parameter, we can start adding SQL statements to the queries that gather data.
Lets start by adding a JOIN for the orders table, orders stats, and orders chart.
function add_join_subquery( $clauses ) {
	global $wpdb;

	$clauses[] = "JOIN {$wpdb->postmeta} currency_postmeta ON {$wpdb->prefix}wc_order_stats.order_id = currency_postmeta.post_id";

	return $clauses;
}

add_filter( 'woocommerce_analytics_clauses_join_orders_subquery', 'add_join_subquery' );
add_filter( 'woocommerce_analytics_clauses_join_orders_stats_total', 'add_join_subquery' );
add_filter( 'woocommerce_analytics_clauses_join_orders_stats_interval', 'add_join_subquery' );
Next, add a WHERE clause
function add_where_subquery( $clauses ) {
  global $wpdb;

	$currency = 'USD';

	if ( isset( $_GET['currency'] ) ) {
		$currency = sanitize_text_field( wp_unslash( $_GET['currency'] ) );
	}

  // Use $wpdb->prepare to safely escape the currency value for SQL.
  $prepared_clause = $wpdb->prepare(
      'AND currency_postmeta.meta_key = %s AND currency_postmeta.meta_value = %s',
      '_order_currency',
      $currency
  );

  $clauses[] = $prepared_clause;

	return $clauses;
}

add_filter( 'woocommerce_analytics_clauses_where_orders_subquery', 'add_where_subquery' );
add_filter( 'woocommerce_analytics_clauses_where_orders_stats_total', 'add_where_subquery' );
add_filter( 'woocommerce_analytics_clauses_where_orders_stats_interval', 'add_where_subquery' );
And finally, a SELECT clause.
function add_select_subquery( $clauses ) {
	$clauses[] = ', currency_postmeta.meta_value AS currency';

	return $clauses;
}

add_filter( 'woocommerce_analytics_clauses_select_orders_subquery', 'add_select_subquery' );
add_filter( 'woocommerce_analytics_clauses_select_orders_stats_total', 'add_select_subquery' );
add_filter( 'woocommerce_analytics_clauses_select_orders_stats_interval', 'add_select_subquery' );
Lets head back to the Orders Report and see if it works. You can manipulate the dropdown and see the relevant order reflected in the table.
Finishing touches
The orders table could use some customisation to reflect the selected currency. We can add a column to display the currency in index.js. The reportTableData argument is an object of headers, rows, and items, which are arrays of data. We'll need to add a new header and append the currency to each row's data array.
const addTableColumn = (reportTableData) => {
  if ("orders" !== reportTableData.endpoint) {
    return reportTableData;
  }

  const newHeaders = [
    {
      label: "Currency",
      key: "currency",
    },
    ...reportTableData.headers,
  ];
  const newRows = reportTableData.rows.map((row, index) => {
    const item = reportTableData.items.data[index];
    const newRow = [
      {
        display: item.currency,
        value: item.currency,
      },
      ...row,
    ];
    return newRow;
  });

  reportTableData.headers = newHeaders;
  reportTableData.rows = newRows;

  return reportTableData;
};

addFilter("woocommerce_admin_report_table", "dev-blog-example", addTableColumn);
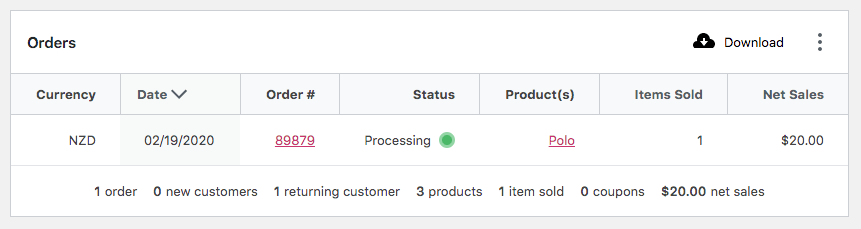
While adding a column is certainly helpful, currency figures in the table and chart only reflect the store currency.
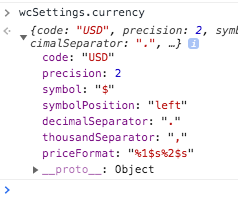
In order to change a Report's currency and number formatting, we can make use of the woocommerce_admin_report_currency JS hook. You can see the store's default sent to the client in wcSettings.currency, but we'll need to change these depending on the currency being viewed and designated by the query parameter ?currency=NZD.
First, lets create some configs in index.js.
const currencies = {
  MXN: {
    code: "MXN",
    symbol: "$MXN", // For the sake of the example.
    symbolPosition: "left",
    thousandSeparator: ",",
    decimalSeparator: ".",
    precision: 2,
  },
  NZD: {
    code: "NZD",
    symbol: "$NZ",
    symbolPosition: "left",
    thousandSeparator: ",",
    decimalSeparator: ".",
    precision: 2,
  },
};
Finally, add our function to the hook which applies a config based on the currency query parameter.
const updateReportCurrencies = (config, { currency }) => {
  if (currency && currencies[currency]) {
    return currencies[currency];
  }
  return config;
};

addFilter(
  "woocommerce_admin_report_currency",
  "dev-blog-example",
  updateReportCurrencies
);
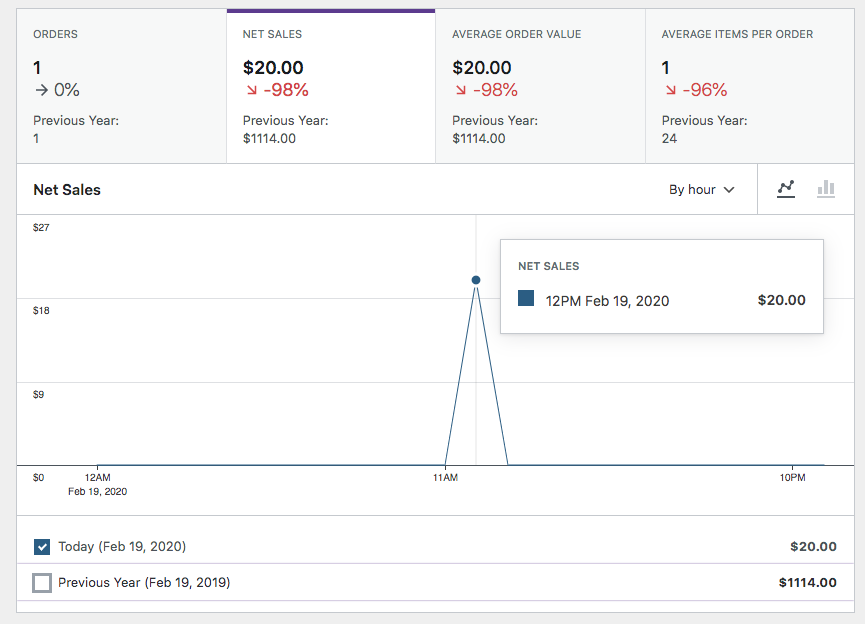
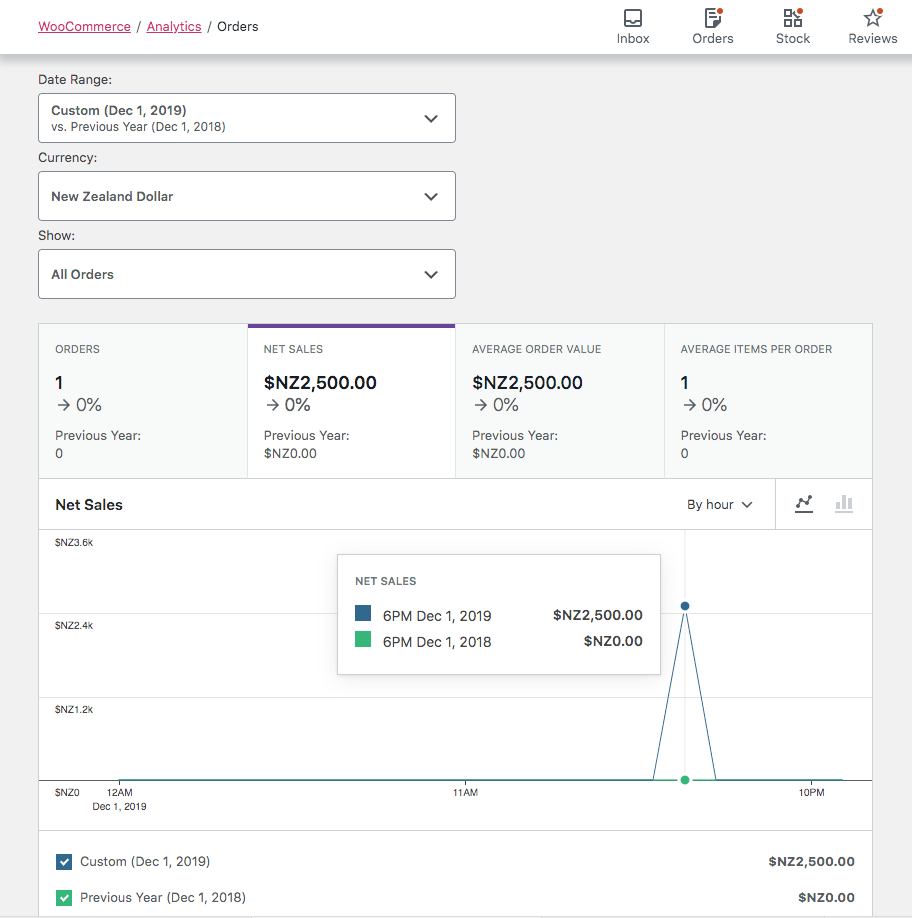
🎉 We can now view our Orders Report and see the currency reflected in monetary values throughout the report.
Conclusion
In this guide, we added a UI element to manipulate query parameters sent to the server and used those values to modify SQL statements which gather report data. In doing so, we established a way to highly customise WC-Admin reports. Hopefully this example illustrates how the platform can be tailored by extensions to bring a powerful experience to users.