Product page theming
WooCommerce's Single Product template is what a shopper will spend the most time viewing before they decide to buy. It's built from three overlapping layers: the classic PHP template, a Block-based compatibility layer that preserves the classic template's action hooks, and the fully Blockified template that default Block themes use.
This guide covers Blockified templates. It builds on the Template hierarchy reference and Global styles for WooCommerce, so if template overrides or theme.json styling are unfamiliar concepts, start with those first.
Requirements
Before you begin, make sure you have the following in place:
- A Block theme. Every Block discussed here renders on the Blockified Single Product template, which only Block themes use by default.
- Familiarity with the Template hierarchy reference. You should understand how
single-product.htmlresolves and how theme overrides take priority. - Familiarity with the Site Editor's List View and Code editor. Several examples in this guide need you to inspect Block markup directly rather than relying on what's visible in the canvas.
- Knowledge of Global styles for WooCommerce. You use
theme.jsonto style Blocks, so understanding this aspect is vital. - An understanding of your catalog's product types. Simple, variable, grouped, and external products each render a different add-to-cart form.
Anatomy of the Single Product template
Locating single-product.html can be confusing, since WooCommerce's own classic template file is called single-product.php. The .html file is a Block Template that resolves through the template hierarchy. WooCommerce ships two versions:
- A plain version that hands the page over to a classic PHP template.
- The Blockified
single-product.htmlcovered here.
WooCommerce chooses the correct template and a theme can override it with its own copy stored under the /templates folder. It's also editable through the Site Editor:
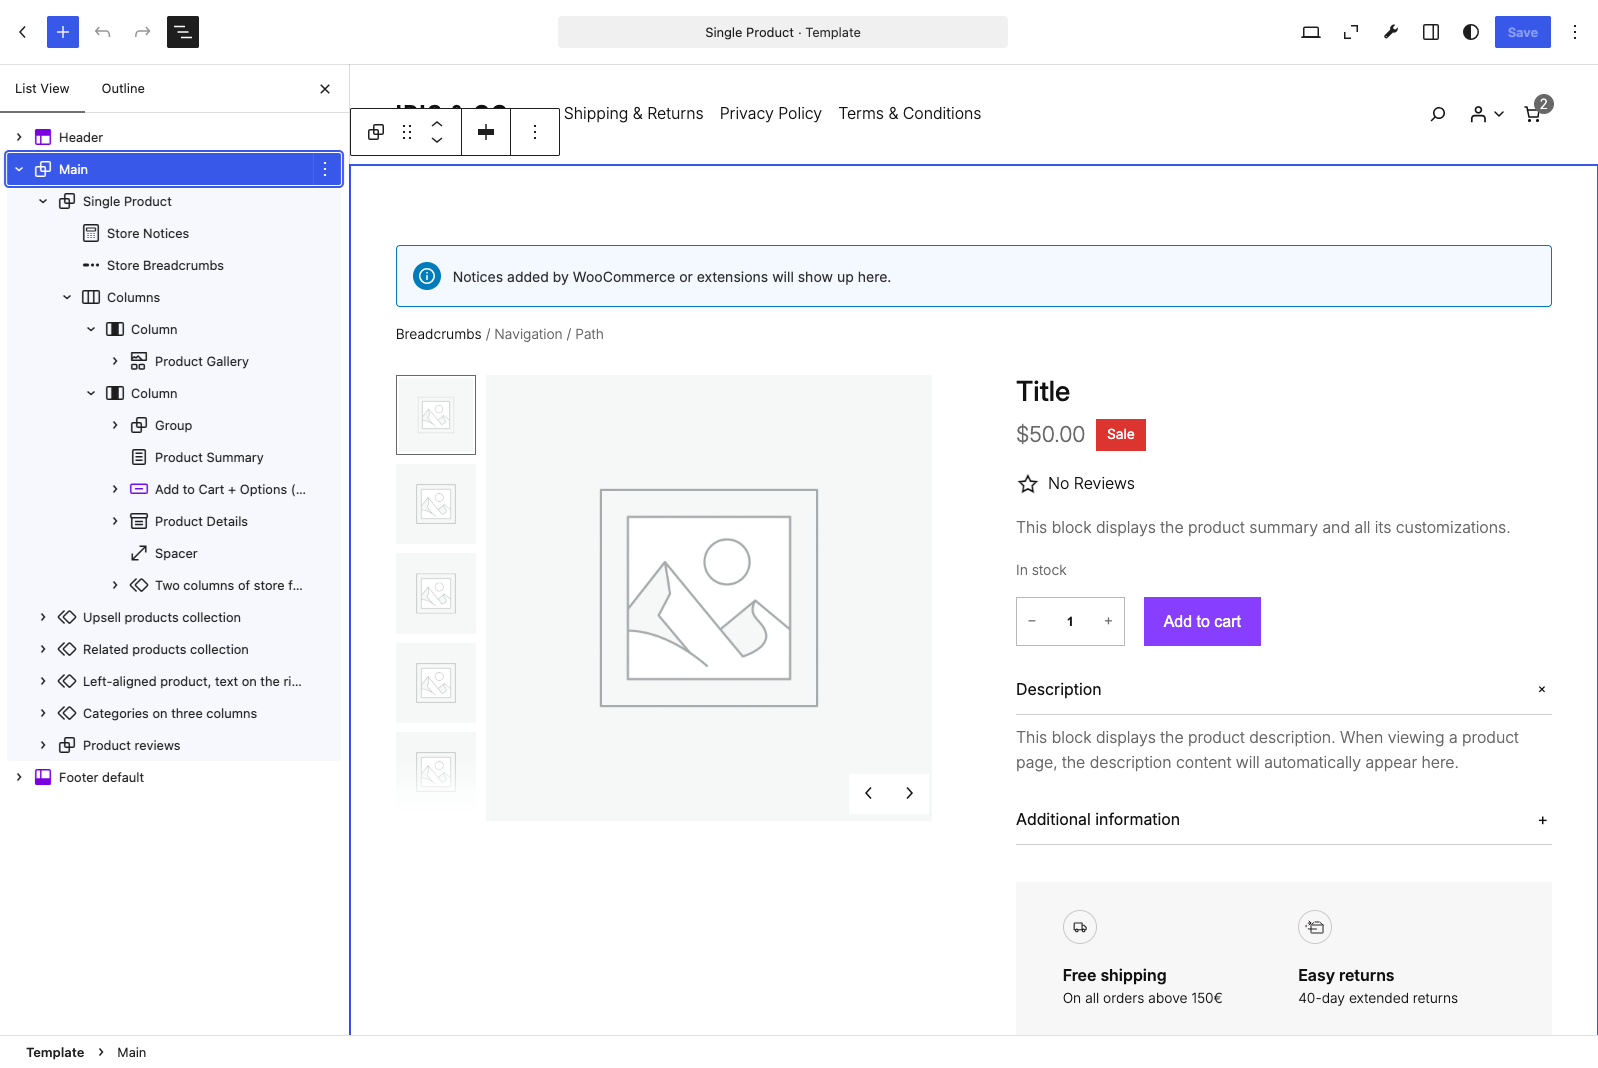
Open Templates > Single Product within the Site Editor and check for a single woocommerce/legacy-template Block. This means WooCommerce is using the classic PHP template. The Blockified versions use Blocks such as woocommerce/product-image-gallery and woocommerce/add-to-cart-form.
The markup wraps the page in the site's shared header and footer template parts, then renders a breadcrumb trail and store notices above the two-column layout:
<!-- wp:template-part {"slug":"header"} /-->

<!-- wp:group {"tagName":"main","layout":{"inherit":true,"type":"constrained"}} -->
<main class="wp-block-group">
	<!-- wp:woocommerce/breadcrumbs /-->
	<!-- wp:woocommerce/store-notices /-->

	<!-- wp:columns {"align":"wide"} -->
	<div class="wp-block-columns alignwide">
		<!-- wp:column {"width":"512px"} -->
		<div class="wp-block-column" style="flex-basis:512px">
			<!-- wp:woocommerce/product-image-gallery /-->
		</div>
		<!-- /wp:column -->

		<!-- wp:column -->
		<div class="wp-block-column">
				<!-- wp:post-title {"level": 1, "__woocommerceNamespace":"woocommerce/product-title"} /-->

				<!-- wp:woocommerce/product-rating /-->

				<!-- wp:woocommerce/product-price {"fontSize":"large"} /-->

				<!-- wp:post-excerpt {"__woocommerceNamespace":"woocommerce/product-summary", "excerptLength":100} /-->

			<!-- wp:woocommerce/add-to-cart-form /-->

			<!-- wp:woocommerce/product-meta -->
			<div class="wp-block-woocommerce-product-meta">
				<!-- wp:group {"layout":{"type":"flex","flexWrap":"nowrap"}} -->
				<div class="wp-block-group">
					<!-- wp:woocommerce/product-sku /-->

					<!-- wp:post-terms {"term":"product_cat","prefix":"Category: "} /-->

					<!-- wp:post-terms {"term":"product_tag","prefix":"Tags: "} /-->
				</div>
				<!-- /wp:group -->
			</div>
			<!-- /wp:woocommerce/product-meta -->
		</div>
		<!-- /wp:column -->
	</div>
	<!-- /wp:columns -->

	<!-- wp:woocommerce/product-details {"align":"wide","className":"is-style-minimal"} /-->

	<!-- wp:pattern {"slug":"woocommerce-blocks/related-products"} /-->
</main>
<!-- /wp:group -->

<!-- wp:template-part {"slug":"footer"} /-->
Everything inside the main Group is specific to the Single Product template. The header and footer template parts are shared across every other template your theme registers. However, this guide only concerns itself with what's inside main.
The Blocks that build the page
Alongside a few single Blocks, the template's primary Blocks fall into three groups: a gallery, an add-to-cart area, and the Product Details Block. This last one covers a product's description, attributes, and reviews.
WooCommerce Blocks preserve a defined set of classic PHP action hooks by anchoring them to specific Blocks. This helps many hook-based extensions continue to work on a Block theme, but only where WooCommerce maps the extension's hook to an available Block anchor.
Regardless, each of these has quirks that you'll need to understand before you start moving things around.
Every block.json referenced throughout this guide lives in wp-content/plugins/woocommerce/client/blocks/assets/js/. It's split between single-purpose display Blocks at blocks/product-elements-blocks/{name}/block.json and container Blocks at blocks/{name}/block.json.
Choosing a gallery Block
The default template uses woocommerce/product-image-gallery, a single Block with no visible child Blocks. Unlike a typical Block settings panel, this has no image size, product link, or sale badge controls. Instead, it wraps around WooCommerce's classic PHP gallery functions. It's the same compatibility layer found in the Product Details Block.
However, there's a second, richer gallery Block: woocommerce/product-gallery. It consists of two child Blocks: thumbnails, and a large image viewer that contains the product image, sale badge, and next/previous controls.
You'll see this version if you use the Single Product Block to embed a product elsewhere on the site rather than on the Single Product template itself:
<!-- wp:woocommerce/product-gallery -->
<div class="wp-block-woocommerce-product-gallery wc-block-product-gallery">
	<!-- wp:woocommerce/product-gallery-thumbnails /-->
	<!-- wp:woocommerce/product-gallery-large-image -->
	<div class="wp-block-woocommerce-product-gallery-large-image wc-block-product-gallery-large-image__inner-blocks">
		<!-- wp:woocommerce/product-image {"showProductLink":false,"showSaleBadge":false} /-->
		<!-- wp:woocommerce/product-sale-badge {"align":"right"} /-->
		<!-- wp:woocommerce/product-gallery-large-image-next-previous /-->
	</div>

	<!-- /wp:woocommerce/product-gallery-large-image -->
</div>
<!-- /wp:woocommerce/product-gallery -->
If your theme's Single Product template only shows the simpler gallery and you want thumbnails and a large-image viewer instead, note that product-gallery restricts its ancestor within block.json to woocommerce/single-product. As such, the Block inserter won't offer it to you.
Two ways to add to cart
Two different Blocks handle adding a product to the cart. woocommerce/add-to-cart-form renders a single form that adapts internally to the product type. It's a simpler starting point as it uses a quantitySelectorStyle attribute to switch between a text input and a stepper. Here, the Block uses the same per-product action hooks (and compatibility pattern) WooCommerce employs elsewhere, rather than use independent markup.
woocommerce/add-to-cart-with-options is newer and replaces the single form with a container that renders a different template part depending on the product type: simple, variable, grouped, or external.
A wrapper Block's markup is always empty. The editable markup for each product type is in separate files:
wp-content/plugins/woocommerce/templates/parts/simple-product-add-to-cart-with-options.htmlwp-content/plugins/woocommerce/templates/parts/variable-product-add-to-cart-with-options.htmlwp-content/plugins/woocommerce/templates/parts/grouped-product-add-to-cart-with-options.htmlwp-content/plugins/woocommerce/templates/parts/external-product-add-to-cart-with-options.html
To customize a layout, you'll need to override the relevant file in your theme's /parts folder.
WooCommerce generates a template part reference for each registered product type without filtering by your current catalog. This is typically the four built-in types plus any extra you register. WooCommerce only provides template part files for the four core types, so a third-party type must provide a valid template part file path through the experimental __experimental_woocommerce_{product_type}_add_to_cart_with_options_block_template_part filter. A matching file in the theme's /parts folder can then override that registered template part, but it cannot enable the product type by itself. Without a valid filter-provided path, the Block has no add-to-cart template to render for that product type.
For example, a variable product's part builds its attribute selector from add-to-cart-with-options-variation-selector and its child Blocks, then adds a quantity selector and the Add to Cart Block underneath:
<!-- wp:woocommerce/add-to-cart-with-options-variation-selector -->
<div class="wp-block-woocommerce-add-to-cart-with-options-variation-selector" role="list">
	<!-- wp:woocommerce/add-to-cart-with-options-variation-selector-attribute -->
	<div class="wp-block-woocommerce-add-to-cart-with-options-variation-selector-attribute" role="listitem">
		<!-- wp:group {"style":{"spacing":{"blockGap":"0.5rem","margin":{"top":"1rem","bottom":"1rem"}}},"layout":{"type":"flex","orientation":"vertical","flexWrap":"nowrap"}} -->
		<div class="wp-block-group" style="margin-top: 1rem; margin-bottom: 1rem">
			<!-- wp:woocommerce/add-to-cart-with-options-variation-selector-attribute-name /-->
			<!-- wp:woocommerce/product-filter-chips -->
			<div class="wp-block-woocommerce-product-filter-chips wc-block-product-filter-chips"></div>
			<!-- /wp:woocommerce/product-filter-chips -->
		</div>
		<!-- /wp:group -->
	</div>
	<!-- /wp:woocommerce/add-to-cart-with-options-variation-selector-attribute -->
</div>
<!-- /wp:woocommerce/add-to-cart-with-options-variation-selector -->

<!-- wp:woocommerce/add-to-cart-with-options-variation-description {"style":{"spacing":{"margin":{"top":"1rem","bottom":"1rem"}}}} /-->

<!-- wp:woocommerce/product-stock-indicator {"style":{"spacing":{"margin":{"top":"1rem","bottom":"1rem"}}}} /-->

<!-- wp:group {"layout":{"type":"flex","flexWrap":"wrap","verticalAlignment":"stretch"}} -->
<div class="wp-block-group">
	<!-- wp:woocommerce/add-to-cart-with-options-quantity-selector {"quantitySelectorStyle":"stepper"} /-->
	<!-- wp:woocommerce/product-button {"textAlign":"left"} /-->
</div>
<!-- /wp:group -->
Because each product type gets its own file under a theme's /parts folder, you can override one product type's add-to-cart layout without touching the others. For instance, a grouped product needs a very different layout. Each child product renders a quantity input, checkbox, or Add to Cart button. This is decided on a per-item basis depending on whether the child product is sold individually, is out of stock, or has options.
This is handled by giving each type a separate template part rather than one form with conditional logic inside it.
The Product Details Block: not as empty as it looks
woocommerce/product-details can look empty as its block.json declares only an align and a hideTabTitle attribute with no default child Blocks of its own:
<!-- wp:woocommerce/product-details {"className":"is-style-minimal"} -->
<div class="wp-block-woocommerce-product-details alignwide is-style-minimal"></div>
<!-- /wp:woocommerce/product-details -->
On the front end, this renders WooCommerce's Description, Additional information, and Reviews tabs. This is a compatibility fallback: when the Block has no inner Blocks, it renders the same tab markup WooCommerce generates on a singular product page.
To get an editable, Blockified version of the same three tabs, add core/accordion (or woocommerce/accordion-group) inside the Product Details Block, then place them as accordion items:
woocommerce/product-descriptiondisplays the product's full description.woocommerce/product-specificationsshows the weight, dimensions, and attributes, withshowAttributes,showDimensions, andshowWeightattributes to control which appear.woocommerce/product-reviewsgives you the review list, along with its own child Blocks for the review's form, author name, rating, date, and pagination.
WooCommerce also auto-detects non-default tabs returned through the woocommerce_product_tabs filter, regardless of whether a plugin, theme, or another customization added them. If you'd rather turn this off, you can use the woocommerce_disable_compatibility_layer filter.
Some Blocks have permanently empty wrapper markup (such as woocommerce/add-to-cart-with-options). For those Blocks, content will be generated at render time based on the template files.
Rearranging the page layout without breaking it
Swapping which template part renders for a given product type is one way of rearranging your page layout. There are also two more:
- Restructuring the shared
single-product.htmltemplate that every product uses. - Overriding the layout for one specific product.
Of course, each has its own mechanics and its own limitations to contend with.
Moving Blocks: context over position
The data for Product Blocks on a Single Product template doesn't rely on its position in the markup. For example, moving the Product Price Block out of its column (or out of the two-column layout entirely) still renders the correct price. This is because the data comes from the template's product context (the postId the template is rendering), not from its position in the DOM.
The limitation is that several product Blocks declare an ancestor restriction in block.json, which controls the Block inserter's placement options. For instance, woocommerce/product-button restricts its ancestor to woocommerce/all-products, woocommerce/single-product, core/post-template, and woocommerce/product-template.
In practice, this means the inserter won't offer you the Add to Cart Button as a top-level Block dropped directly onto an arbitrary template; it expects one of the nearby container Blocks. This is separate from the postId context:
ancestorgates where a Block can be inserted and checks against the Block's actual parents in the tree.usesContext(typicallypostId,query, andqueryId) determines what data a placed Block renders, which is resolved from the template or Query Loop it sits inside.
However, while the Site Editor's List View will show you the Block tree, it doesn't flag which Blocks have contextual ties. The solution is to preview the front end rather than hoping the editor will catch it.
What removing a Block can break
The compatibility layer means some Blocks are doing more under the hood, so removing them has consequences. WooCommerce's classic template fires a sequence of hooks around the product summary, all attached to the woocommerce_single_product_summary action:
| Hook | Priority | Output |
|---|---|---|
woocommerce_template_single_title | 5 | Product title |
woocommerce_template_single_rating | 10 | Star rating |
woocommerce_template_single_price | 10 | Price |
woocommerce_template_single_excerpt | 20 | Short description |
woocommerce_template_single_add_to_cart | 30 | Add-to-Cart form |
woocommerce_template_single_meta | 40 | SKU, categories, tags |
woocommerce_template_single_sharing | 50 | Sharing integrations |
On the Blockified template, the woocommerce_single_product_summary action is wired to the core/post-excerpt Block rendering the short description. Any extension that still adds content through this hook is anchoring itself to that Block. In practice, you'll use this for elements such as trust badges and upsell prompts.
The compatibility layer handles sharing separately. It removes woocommerce_template_single_sharing from the summary action and injects the underlying woocommerce_share action before Product Details. Removing the short-description Block doesn't remove sharing output, but removing Product Details can.
Also, Product Details only calls WordPress' the_post() function while rendering its legacy fallback tabs. Once you make it Blockified, this call disappears. Related Products' underlying woocommerce/product-template Block calls the_post() for each product in the loop, then wp_reset_postdata(). This restores global $product to the product being viewed, independent of the state of Product Details.
Before removing the short-description Post Excerpt, Product Details, or Related Products Blocks from a live template, test the change against whatever extensions your store runs. An empty layout slot isn't always a visual change.
Going narrower: overriding one product
The broadest scope of rearrangement applies to every product, but only one has the narrowest. On the Single Product template, this means a file named single-product-{slug}.html in your theme's /templates folder takes priority over single-product.html whenever you view the product. The others continue to fall back to the general template.
This would suit a flagship or seasonal product that needs a layout the rest of your catalog doesn't, while not duplicating the logic in PHP or maintaining a separate page template. Here, you can copy your theme's existing single-product.html, rename it to match the product's slug, and adjust:
your-theme/
└── templates/
    ├── single-product.html
    └── single-product-limited-edition-hoodie.html
WordPress resolves this based on the product being viewed and the same ancestor and compatibility-layer considerations also apply to a per-product override.
Styling product Blocks with theme.json
The Global styles guide covers the general system for styling WooCommerce Blocks through theme.json. However, before you rely on that system, there are some specifics with the product page Blocks to understand.
Where a style will apply
Several product Blocks declare a top-level selectors object in block.json. Its root property tells WordPress where to apply theme.json styles instead of assuming the Block's outer wrapper element.
// woocommerce/product-image
"selectors": {
  "root": ".wp-block-woocommerce-product-image.wc-block-components-product-image, .wp-block-woocommerce-product-image .wc-block-components-product-image"
}

// woocommerce/product-rating
"selectors": {
  "root": ".wp-block-woocommerce-product-rating.wc-block-components-product-rating, .wp-block-woocommerce-product-rating .wc-block-components-product-rating"
}

// woocommerce/product-price
"selectors": {
  "root": ".wp-block-woocommerce-product-price .wc-block-components-product-price"
}
These selectors can target the wrapper, a nested element, or both. In practice, styling a Block in theme.json doesn't always mean styling the wrapper element. If a color or typography change through styles.blocks.woocommerce/product-price doesn't appear where you expect it in the rendered markup, check the Block's registered selectors.root value to see which element receives the styles.
Remember: a Block's registered selectors aren't visible from the Site Editor. Make sure to check the Block's block.json in the WooCommerce source, or inspect the generated global styles <style> tag in your browser's DevTools first.
Partial support isn't full support
A Block's supports object tells you which style categories theme.json can touch for the Block, with various support on offer per-Block. For example, woocommerce/product-button declares border support for radius only, so it does not expose border color, width, or style through theme.json. In contrast, woocommerce/product-image supports border color, width, style, and radius.
If a design calls for a colored border around the Product Button, this is a job for CSS rather than theme.json.
This same principle applies to color: woocommerce/product-rating supports text color but not background or link color:
{
  "styles": {
    "blocks": {
      "woocommerce/product-rating": {
        "color": {
          "text": "var(--wp--preset--color--accent-1)"
        }
      }
    }
  }
}
Styling Fill and Outline directly
woocommerce/product-button registers two Fill and Outline Block styles. Both are standard Block style variations that theme.json can style independently using a scoped variations property based on what supported properties you need:
{
  "styles": {
    "blocks": {
      "woocommerce/product-button": {
        "color": {
          "text": "var(--wp--preset--color--base)",
          "background": "var(--wp--preset--color--contrast)"
        },
        "variations": {
          "outline": {
            "color": {
              "text": "var(--wp--preset--color--contrast)"
            }
          }
        }
      }
    }
  }
}
Because border color isn't part of this Block's supported style properties, the Outline style's border rendering comes from the Block's bundled stylesheet. So, theme.json can shift the text and background colors used within each variation, but not the border itself.
Practical customization examples
There are a few typical tasks for the Single Product template that can stay fully within the Block system rather than reaching for PHP. This lets you edit through the Site Editor rather than tie it to a theme's code.
Building the Blockified Product Details tabs
This is a good example of a Blockified version showing the compatibility layer's fallback behavior explained earlier:
<!-- wp:woocommerce/product-details {"align":"wide"} -->
<div class="wp-block-woocommerce-product-details alignwide">
	<!-- wp:accordion -->
	<div class="wp-block-accordion" role="group">
		<!-- wp:accordion-item -->
		<div class="wp-block-accordion-item">
			<!-- wp:accordion-heading {"showIcon":false} -->
			<h3 class="wp-block-accordion-heading">
				<button type="button" class="wp-block-accordion-heading__toggle">
					<span class="wp-block-accordion-heading__toggle-title">Description</span>
				</button>
			</h3>
			<!-- /wp:accordion-heading -->
			<!-- wp:accordion-panel -->
			<div class="wp-block-accordion-panel" role="region">
				<!-- wp:woocommerce/product-description /-->
			</div>
			<!-- /wp:accordion-panel -->
		</div>
		<!-- /wp:accordion-item -->
	</div>
	<!-- /wp:accordion -->
</div>
<!-- /wp:woocommerce/product-details -->
Non-default tabs returned through the woocommerce_product_tabs filter are automatically injected by WooCommerce. The default Specifications and Reviews tabs aren't, so you'll need to repeat the pattern for woocommerce/product-specifications and woocommerce/product-reviews.
Replacing Related Products with a curated pick
The default Related Products pattern queries by shared categories and tags, which isn't always the right fit where you need specific product pairings, such as an accessory that goes only with one product. Swapping in a hand-picked query means changing layout and sizing attributes as well as the query attributes:
<!-- wp:woocommerce/product-collection {"queryId":0,"query":{"perPage":4,"pages":1,"postType":"product","inherit":false,"isProductCollectionBlock":true,"woocommerceHandPickedProducts":["154","289","310","422"]},"collection":"woocommerce/product-collection/hand-picked","displayLayout":{"type":"flex","columns":4,"shrinkColumns":true},"dimensions":{"widthType":"fill"}} -->
<div class="wp-block-woocommerce-product-collection">
	<!-- wp:heading {"textAlign":"center","level":2,"style":{"spacing":{"margin":{"bottom":"1rem"}}}} -->
	<h2 class="wp-block-heading has-text-align-center">You may also like</h2>
	<!-- /wp:heading -->

	<!-- wp:woocommerce/product-template -->
		<!-- wp:woocommerce/product-image {"showSaleBadge":false,"style":{"dimensions":{"aspectRatio":"1/1"}}} -->
		<div class="wp-block-woocommerce-product-image">
			<!-- wp:woocommerce/product-sale-badge {"align":"right"} /-->
		</div>
		<!-- /wp:woocommerce/product-image -->

		<!-- wp:post-title {"textAlign":"center","level":2,"fontSize":"medium","style":{"spacing":{"margin":{"bottom":"0.75rem","top":"0"}},"typography":{"lineHeight":"1.4"}},"isLink":true,"__woocommerceNamespace":"woocommerce/product-title"} /-->

		<!-- wp:woocommerce/product-price {"textAlign":"center","fontSize":"small"} /-->

		<!-- wp:woocommerce/product-button {"textAlign":"center","fontSize":"small"} /-->
	<!-- /wp:woocommerce/product-template -->
</div>
<!-- /wp:woocommerce/product-collection -->
You can replace this in place of the woocommerce-blocks/related-products pattern in your template override, then update the product IDs in woocommerceHandPickedProducts if the pairing needs to differ across your catalog.