
Contents
Introduction
Onboarding is a critical part of the merchant’s user experience. It helps set them up for success and ensures they’re not only using your extension correctly but also getting the most out of it. There are a few especially useful features that you can take advantage of as a developer to help onboard merchants who are using your extension:
- Setup tasks
- Store management links
- Admin notes
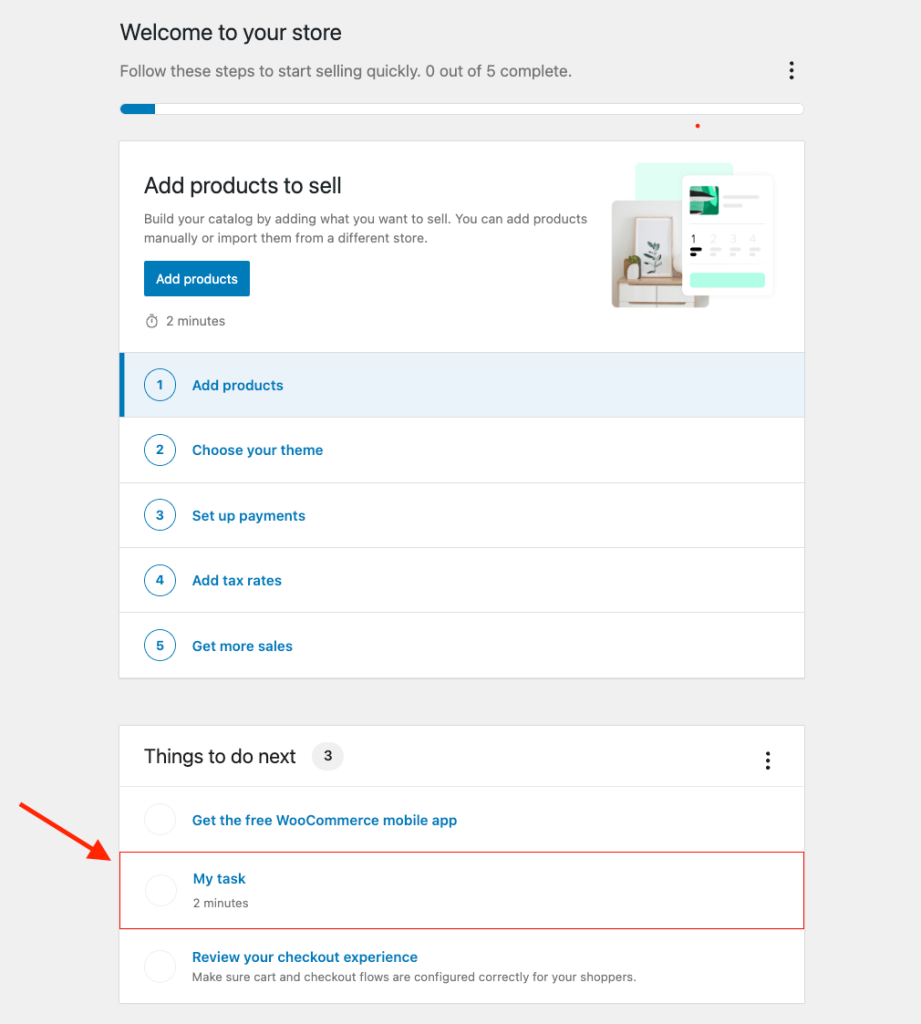
Using setup tasks

Setup tasks appear on the WooCommerce Admin home screen and prompt a merchant to complete certain steps in order to set up your extension. Adding tasks is a two-step process that requires:
- Registering the task (and its JavaScript) using PHP
- Using JavaScript to build the task, set its configuration, and add it to the task list
Registering the task with PHP
To register your task as an extended task list item, you’ll need to start by creating a new PHP class that extends the Task class. This class will define the properties and behavior of your custom task.
<?php
/**
 * Custom task example.
 *
 */
use Automattic\WooCommerce\Admin\Features\OnboardingTasks\Task;

/**
 * Custom task class.
 */
class MyTask extends Task {
	/**
	 * Get the task ID.
	 *
	 * @return string
	 */
	public function get_id() {
		return 'my-task';
	}

	/**
	 * Title.
	 *
	 * @return string
	 */
	public function get_title() {
		return __( 'My task', 'woocommerce' );
	}

	/**
	 * Content.
	 *
	 * @return string
	 */
	public function get_content() {
		return __( 'Add your task description here for display in the task list.', 'woocommerce' );
	}

	/**
	 * Time.
	 *
	 * @return string
	 */
	public function get_time() {
		return __( '2 minutes', 'woocommerce' );
	}
}
After defining your custom task class, add it to the task list by calling the add_task method on the TaskLists class. Please note that you need to call the add_task method before or in the init hook because onboarding tasks are registered in the init hook.
/**
 * Register the task.
 */
function add_my_task() {
	require_once __DIR__ . '/class-mytask.php';
	$task_lists = \Automattic\WooCommerce\Admin\Features\OnboardingTasks\TaskLists::instance();

	// Add the task to the extended list.
	$task_lists::add_task(
		'extended',
		new MyTask(
			$task_lists::get_list( 'extended' ),
		)
	);
}

add_action( 'init', 'add_my_task' );
The TaskList class represents a task list. It contains properties and methods for managing task list. We currently have three predefined task lists
setup: The default task listextended: The “Things to do next” task listsecret_tasklist: The “Secret” task list that is used for having tasks that are accessed by other means.
Adding the task using JavaScript
You need to build the task component, set its configuration, and add it to the task list. For example, the JavaScript file for a simple task might look something like this:
/**
 * External dependencies
 */
import { createElement } from '@wordpress/element';
import { __ } from '@wordpress/i18n';
import { Card, CardBody } from '@wordpress/components';
import { ONBOARDING_STORE_NAME } from '@woocommerce/data';
import { registerPlugin } from '@wordpress/plugins';
import { useDispatch } from '@wordpress/data';
import {
	WooOnboardingTask,
	WooOnboardingTaskListItem,
} from '@woocommerce/onboarding';

const Task = ( { onComplete, task } ) => {
	const { actionTask } = useDispatch( ONBOARDING_STORE_NAME );
	const { isActioned } = task;

	return (
		<Card className="woocommerce-task-card">
			<CardBody>
				{ __(
					"This task's completion status is dependent on being actioned. The action button below will action this task, while the complete button will optimistically complete the task in the task list and redirect back to the task list. Note that in this example, the task must be actioned for completion to persist.",
					'plugin-domain'
				) }{ ' ' }
				<br />
				<br />
				{ __( 'Task actioned status: ', 'plugin-domain' ) }{ ' ' }
				{ isActioned ? 'actioned' : 'not actioned' }
				<br />
				<br />
				<div>
					<button
						onClick={ () => {
							actionTask( 'my-task' );
						} }
					>
						{ __( 'Action task', 'plugin-domain' ) }
					</button>
					<button onClick={ onComplete }>
						{ __( 'Complete', 'plugin-domain' ) }
					</button>
				</div>
			</CardBody>
		</Card>
	);
};

registerPlugin( 'add-task-content', {
	render: () => (
		<WooOnboardingTask id="my-task">
			{ ( {
				onComplete,
				// eslint-disable-next-line @typescript-eslint/no-unused-vars
				query,
				task,
			} ) => <Task onComplete={ onComplete } task={ task } /> }
		</WooOnboardingTask>
	),
	scope: 'woocommerce-tasks',
} );

registerPlugin( 'my-task-list-item-plugin', {
	scope: 'woocommerce-tasks',
	render: () => (
		<WooOnboardingTaskListItem id="my-task">
			{ ( { defaultTaskItem: DefaultTaskItem } ) => (
				// Add a custom wrapper around the default task item.
				<div
					className="woocommerce-custom-tasklist-item"
					style={ {
						border: '1px solid red',
					} }
				>
					<DefaultTaskItem />
				</div>
			) }
		</WooOnboardingTaskListItem>
	),
} );
In the example above, the extension does a few different things. Let’s break it down:
Handle imports
First, import any functions, components, or other utilities from external dependencies.
/**
 * External dependencies
 */
import { createElement } from '@wordpress/element';
import { __ } from '@wordpress/i18n';
import { Card, CardBody } from '@wordpress/components';
import { ONBOARDING_STORE_NAME } from '@woocommerce/data';
import { registerPlugin } from '@wordpress/plugins';
import { useDispatch } from '@wordpress/data';
import {
	WooOnboardingTask,
	WooOnboardingTaskListItem,
} from '@woocommerce/onboarding';
Construct the component
Next, we create a functional component that returns our task card. The intermixed JavaScript/HTML syntax we’re using here is called JSX. If you’re unfamiliar with it, you can read more about it in the React docs.
const Task = ( { onComplete, task } ) => {
	const { actionTask } = useDispatch( ONBOARDING_STORE_NAME );
	const { isActioned } = task;

	return (
		<Card className="woocommerce-task-card">
			<CardBody>
				{ __(
					"This task's completion status is dependent on being actioned. The action button below will action this task, while the complete button will optimistically complete the task in the task list and redirect back to the task list. Note that in this example, the task must be actioned for completion to persist.",
					'plugin-domain'
				) }{ ' ' }
				<br />
				<br />
				{ __( 'Task actioned status: ', 'plugin-domain' ) }{ ' ' }
				{ isActioned ? 'actioned' : 'not actioned' }
				<br />
				<br />
				<div>
					<button
						onClick={ () => {
							actionTask( 'my-task' );
						} }
					>
						{ __( 'Action task', 'plugin-domain' ) }
					</button>
					<button onClick={ onComplete }>
						{ __( 'Complete', 'plugin-domain' ) }
					</button>
				</div>
			</CardBody>
		</Card>
	);
};
In the example above, we’re using the Card and CardBody components to construct our task’s component. The div inside the CardBody uses a JavaScript expression ({}) to embed a ternary operator that uses the component’s state to determine whether to display the task as complete or incomplete.
Register the Plugin for Task Content
Next, we register the Task component as a plugin named “add-task-content” using SlotFills. This plugin nests the Task component within a WooOnboardingTask component and passes the necessary properties. We also specify the scope of the plugin as “woocommerce-tasks” to make it effective only within WooCommerce’s task list.
registerPlugin( 'add-task-content', {
	render: () => (

			{ ( {
				onComplete,
				// eslint-disable-next-line @typescript-eslint/no-unused-vars
				query,
				task,
			} ) =>  }

	),
	scope: 'woocommerce-tasks',
} );
Register the Plugin for Task List Item Customization
registerPlugin( 'my-task-list-item-plugin', {
  scope: 'woocommerce-tasks',
  render: () => (
    <WooOnboardingTaskListItem id="my-task">
      { ( { defaultTaskItem: DefaultTaskItem } ) => (
        // Add a custom wrapper around the default task item.
        <div
          className="woocommerce-custom-tasklist-item"
          style={ {
            border: '1px solid red',
          } }
        >
          <DefaultTaskItem />
        </div>
      ) }
    </WooOnboardingTaskListItem>
  ),
} );
Finally, we register another plugin named “my-task-list-item-plugin.” This plugin is used to customize the appearance of task list items. It also targets WooCommerce’s task list and wraps the DefaultTaskItem component within a custom wrapper with additional styling.
In summary, JS file extends and customizes the functionality of WooCommerce’s task list, allowing users to better manage tasks and personalize the appearance of task list items.
Registering the task with JavaScript
In addition to registering the task in php, you’ll also need to register and enqueue the transpiled JavaScript file containing your task component and its configuration. A common way to do this is to create a dedicated registration function that hooks into the admin_enqueue_scripts action in WordPress. Below is an annotated example of how this registration might look:
/**
 * Register the scripts to fill the task content on the frontend.
 */
function add_task_register_script() {
	if (
		! class_exists( 'Automattic\WooCommerce\Internal\Admin\Loader' ) ||
		! \Automattic\WooCommerce\Admin\PageController::is_admin_or_embed_page()
	) {
		return;
	}

	$asset_file = require __DIR__ . '/dist/index.asset.php';
	wp_register_script(
		'add-task',
		plugins_url( '/dist/index.js', __FILE__ ), // task registration JS
		$asset_file['dependencies'],
		$asset_file['version'],
		true
	);

	wp_enqueue_script( 'add-task' );
}

add_action( 'admin_enqueue_scripts', 'add_task_register_script' );
By following these steps, your custom task should appear in the WooCommerce onboarding tasklist.
For a complete example of adding a custom task as a WordPress plugin, you can refer to the examples directory.
To learn more about the tasklist, you can refer to the tasklist documentation.
Using Store Management Links
When a merchant completes all of the items on the onboarding task list, WooCommerce replaces it with a section containing a list of handy store management links. Discoverability can be a challenge for extensions, so this section is a great way to bring more attention to key features of your extension and help merchants navigate to them.
The store management section has a relatively narrow purpose, so this section does not currently support external links. Instead, it is meant for navigating quickly within WooCommerce.
Adding your own store management links is a simple process that involves:
- Installing dependencies for icon support
- Enqueuing an admin script in your PHP
- Hooking in via a JavaScript filter to provide your link object
Installing the Icons package
Store management links use the @wordpress/icons package. If your extension isn’t already using it, you’ll need to add it to your extension’s list of dependencies.
npm install @wordpress/icons --save
Enqueuing the JavaScript
The logic that adds your custom link to the store management section will live in a JavaScript file. We’ll register and enqueue that file with WordPress in our PHP file:
function custom_store_management_link() {
    wp_enqueue_script(
        'add-my-custom-link',
        plugins_url( '/dist/add-my-custom-link.js', __FILE__ ),
        array( 'wp-hooks' ),
        10
    );
}
add_action( 'admin_enqueue_scripts', 'custom_store_management_link' );
The first argument of this call is a handle, the name by which WordPress will refer to the script we’re enqueuing. The second argument is the URL where the script is located.
The third argument is an array of script dependencies. By supplying the wp-hooks handle in that array, we’re ensuring that our script will have access to the addFilter function we’ll be using to add our link to WooCommerce’s list.
The fourth argument is a priority, which determines the order in which JavaScripts are loaded in WordPress. We’re setting a priority of 10 in our example. It’s important that your script runs before the store management section is rendered. With that in mind, make sure your priority value is lower than 15 to ensure your link is rendered properly.
Supply your link via JavaScript
Finally, in the JavaScript file you enqueued above, hook in to the woocommerce_admin_homescreen_quicklinks filter and supply your task as a simple JavaScript object.
import { megaphone } from '@wordpress/icons';
import { addFilter } from '@wordpress/hooks';
addFilter(
    'woocommerce_admin_homescreen_quicklinks',
    'my-extension',
    ( quickLinks ) => {
        return [
            ...quickLinks,
            {
                title: 'My link',
                href: 'link/to/something',
                icon: megaphone,
            },
        ];
    }
);
Using Admin Notes
Admin Notes are meant for displaying insightful information about your WooCommerce store, extensions, activity, and achievements. They’re also useful for displaying information that can help with the day-to-day tasks of managing and optimizing a store. A good general rule is to use Admin Notes for information that is:
- Timely
- Relevant
- Useful
With that in mind, you might consider using Admin Notes to celebrate a particular milestone that a merchant has passed, or to provide additional guidance about using a specific feature or flow. Conversely, you shouldn’t use Admin Notes to send repeated messages about the same topic or target all users with a note that is only relevant to a subset of merchants. It’s okay to use Admin Notes for specific promotions, but you shouldn’t abuse the system. Use your best judgement and remember the home screen is meant to highlight a store’s most important actionable tasks.
Despite being a part of the new React-powered admin experience in WooCommerce, Admin Notes are available to developers via a standard PHP interface.
The recommended approach for using Admin Notes is to encapsulate your note within its own class that uses the NoteTraits trait included with WooCommerce Admin. Below is a simple example of what this might look like:
<?php
/**
 * Simple note provider
 *
 * Adds a note with a timestamp showing when the note was added.
 */
namespace My\Wonderfully\Namespaced\Extension\Area;
// Exit if this code is accessed outside of WordPress.
defined ( 'ABSPATH' ) || exit;
// Check for Admin Note support
if ( ! class_exists( 'Automattic\WooCommerce\Admin\Notes\Notes' ) ||
     ! class_exists( 'Automattic\WooCommerce\Admin\Notes\NoteTraits' )) {
    return;
}
// Make sure the WooCommerce Data Store is available
if ( ! class_exists( 'WC_Data_Store' ) ) {
    return;
}
/**
 * Example note class.
 */
class ExampleNote {
    // Use the Note class to create Admin Note objects
    use Automatic\WooCommerce\Admin\Notes\Note;
    // Use the NoteTraits trait, which handles common note operations.
    use Automatic\WooCommerce\Admin\Notes\NoteTraits;
    // Provide a note name.
    const NOTE_NAME = 'my-prefix-example-note';
    public static function get_note() {
    // Our welcome note will include information about when the extension
    // was activated.  This is just for demonstration. You might include
    // other logic here depending on what data your note should contain.
        $activated_time = current_time( 'timestamp', 0 );
        $activated_time_formatted = date( 'F jS', $activated_time );
        // Instantiate a new Note object
        $note = new Automattic\WooCommerce\Admin\Notes\Note();
        // Set our note's title.
        $note->set_title( 'Getting Started' );
        // Set our note's content.
        $note->set_content(
            sprintf(
                'Extension activated on %s.', $activated_time_formatted
            )
        );
        // In addition to content, notes also support structured content.
        // You can use this property to re-localize notes on the fly, but
        // that is just one use. You can store other data here too. This
        // is backed by a longtext column in the database.
        $note->set_content_data( (object) array(
            'getting_started'       => true,
            'activated'             => $activated_time,
            'activated_formatted'   => $activated_time_formatted
        ) );
        // Set the type of the note. Note types are defined as enum-style
        // constants in the Note class. Available note types are:
        // error, warning, update, info, marketing.
        $note->set_type( Note::E_WC_ADMIN_NOTE_INFORMATIONAL );
        // Set the type of layout the note uses. Supported layout types are:
        // 'banner', 'plain', 'thumbnail'
        $note->set_layout( 'plain' );
        // Set the image for the note. This property renders as the src
        // attribute for an img tag, so use a string here.
        $note->set_image( '' );
        // Set the note name and source.  You should store your extension's
        //   name (slug) in the source property of the note.  You can use
        //   the name property of the note to support multiple sub-types of
        //   notes.  This also gives you a handy way of namespacing your notes.
        $note->set_source( 'inbox-note-example');
        $note->set_name( self::NOTE_NAME );
        // Add action buttons to the note.  A note can support 0, 1, or 2 actions.
        //   The first parameter is the action name, which can be used for event handling.
        //   The second parameter renders as the label for the button.
        //   The third parameter is an optional URL for actions that require navigation.
        $note->add_action(
            'settings', 'Open Settings', '?page=wc-settings&tab=general'
        );
        $note->add_action(
            'learn_more', 'Learn More', 'https://example.com'
        );
        return $note;
    }
}
function my_great_extension_activate() {
    // This uses the functionality from the NoteTraits trait to conditionally add your note if it passes all of the appropriate checks.
    ExampleNote::possibly_add_note();
}
register_activation_hook( __FILE__, 'my_great_extension_activate' );
function my_great_extension_deactivate() {
    // This uses the functionality from the NoteTraits trait to conditionally remove your note if it passes all of the appropriate checks.
    ExampleNote::possibly_delete_note();
}
register_deactivation_hook( __FILE__, 'my_great_extension_deactivate' );
Breaking it down
Let’s break down the example above to examine what each section does.
Namespacing and feature availability checks
First, we’re doing some basic namespacing and feature availability checks, along with a safeguard to make sure this file only executes within the WordPress application space.
namespace My\Wonderfully\Namespaced\Extension\Area;
defined ( 'ABSPATH' ) || exit;
if ( ! class_exists( 'Automattic\WooCommerce\Admin\Notes\Notes') ||
     ! class_exists( 'Automattic\WooCommerce\Admin\Notes\NoteTraits') ) {
    return;
}
if ( ! class_exists( 'WC_Data_Store' ) ) {
    return;
}
Using Note and NoteTraits objects
Next, we define a simple class that will serve as a note provider for our note. To create and manage note objects, we’ll import the Note and NotesTraits classes from WooCommerce Admin.
class ExampleNote {
    use Automatic\WooCommerce\Admin\Notes\Note;
    use Automatic\WooCommerce\Admin\Notes\NoteTraits;
}
Provide a unique note name
Before proceeding, create a constant called NOTE_NAME and assign a unique note name to it. The NoteTraits class uses this constant for queries and note operations.
const NOTE_NAME = 'my-prefix-example-note';
Configure the note’s details
Once you’ve set your note’s name, you can define and configure your note. The NoteTraits class will call self::get_note() when performing operations, so you should encapsulate your note’s instantiation and configuration in a static function called get_note() that returns a Note object.
public static function get_note() {
    // We'll fill this in with logic that instantiates a Note object
    //   and sets its properties.
}
Inside our get_note() function, we’ll handle any logic for collecting data our Note may need to display. Our example note will include information about when the extension was activated, so this bit of code is just for demonstration. You might include other logic here depending on what data your note should contain.
$activated_time = current_time( 'timestamp', 0);
$activated_time_formatted = date( 'F jS', $activated_time );
Next, we’ll instantiate a new Note object.
$note = new Note();
Once we have an instance of the Note class, we can work with its API to set its properties, starting with its title.
$note->set_title( 'Getting Started' );
Then we’ll use some of the timestamp data we collected above to set the note’s content.
$note->set_content(
    sprintf(
        'Extension activated on %s.', $activated_time_formatted
    )
);
In addition to regular content, notes also support structured content using the content_data property. You can use this property to re-localize notes on the fly, but that is just one use case. You can store other data here too. This is backed by a longtext column in the database.
$note->set_content_data( (object) array(
    'getting_started'     => true,
    'activated'           => $activated_time,
    'activated_formatted' => $activated_time_formatted
) );
Next, we’ll set the note’s type property. Note types are defined as enum-style class constants in the Note class. Available note types are error, warning, update, info, and marketing. When selecting a note type, be aware that the error and update result in the note being shown as a Store Alert, not in the Inbox. It’s best to avoid using these types of notes unless you absolutely need to.
$note->set_type( Note::E_WC_ADMIN_NOTE_INFORMATIONAL );
Admin Notes also support a few different layouts. You can specify banner, plain, or thumbnail as the layout. If you’re interested in seeing the different layouts in action, take a look at this simple plugin that you can install to experiment with them.
We’ll choose plain as our layout, but it’s also the default, so we could leave this property alone and the effect would be the same.
$note->set_layout( 'plain' );
If you have an image that you want to add to your Admin Note, you can specify it using the set_image function. This property ultimately renders as the src attribute on an img tag, so use a string here.
$note->set_image( '' );
Next, we’ll set the values for our Admin Note’s name and source properties. As a best practice, you should store your extension’s name (i.e. its slug) in the source property of the note. You can use the name property to support multiple sub-types of notes. This gives you a handy way of namespacing your notes and managing them at both a high and low level.
$note->set_source( 'inbox-note-example');
$note->set_name( self::NOTE_NAME );
Admin Notes can support 0, 1, or 2 actions (buttons). You can use these actions to capture events that trigger asynchronous processes or help the merchant navigate to a particular view to complete a step, or even simply to provide an external link for further information. The add_action() function takes up to three arguments. The first is the action name, which can be used for event handling, the second renders as a label for the action’s button, and the third is an optional URL for actions that require navigation.
$note->add_action(
    'settings', 'Open Settings', '?page=wc-settings&tab=general'
);
$note->add_action(
    'learn_more', 'Learn More', 'https://example.com'
);
Finally, remember to have the get_note() function return the configured Note object.
return $note;
Adding and deleting notes
To add and delete notes, you can use the helper functions that are part of the NoteTraits class: possibly_add_note() and its counterpart possibly_delete_note(). These functions will handle some of the repetitive logic related to note management and will also run checks to help you avoid creating duplicate notes.
Our example extension ties these calls to activation and deactivation hooks for the sake of simplicity. While there are many events for which you may want to add Notes to a merchant’s inbox, deleting notes upon deactivation and uninstallation is an important part of managing your extension’s lifecycle.
function my_great_extension_activate() {
    ExampleNote::possibly_add_note();
}
register_activation_hook( __FILE__, 'my_great_extension_activate' );
function my_great_extension_deactivate() {
    ExampleNote::possibly_delete_note();
}
register_deactivation_hook( __FILE__, 'my_great_extension_deactivate' );