Co-written by @ralucastn and @nielslange
This is chapter 2 of 5 in the series Getting to Know Woo: A Series on the Cart and Checkout Blocks.
In our previous post in this series, we learned about the architecture of the Cart and Checkout blocks. Now, we’re ready for our first stop on covering extensibility in this series: the customization of content in the Cart and Checkout blocks.
In this post, we’ll delve into the intricacies of adding custom inner blocks, Slot and Fill (a tool that gives you the possibility to render your own HTML in pre-defined places in the Cart and Checkout blocks), as well as how to expose your data through the Store API, enabling you to wield greater control over a store’s checkout experience.
Adding Custom Content to the Cart and Checkout Blocks
Inner Blocks
When it comes to customizing the content of the Cart and Checkout blocks, adding custom inner blocks is the main and recommended way. You can create custom blocks that can be inserted automatically or optionally, moved or locked to a place, can be edited, and have attributes and settings, just as the core inner blocks.
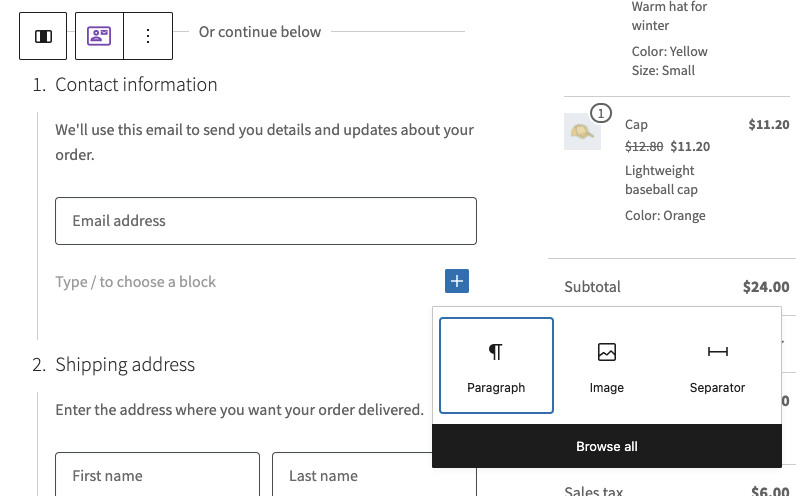
For information about creating and configuring an inner block see our documentation on GitHub about Inner Blocks or check out our Extending the WooCommerce Checkout Block tutorial:
Slot and Fill
Another tool for adding your custom content in specific places in the Cart and Checkout blocks is Slot and Fill. It gives you the possibility to render your own HTML in pre-defined places in the Cart and Checkout blocks. Your component will get access to contextual data and will get re-rendered when needed.
Available Slots
- ExperimentalDiscountsMeta
- ExperimentalOrderLocalPickupPackages
- ExperimentalOrderMeta
- ExperimentalOrderShippingPackages
Please note that the list might change as we are continuously working on graduating or removing experimental features.
Read more about Slot and Fill on our GitHub documentation files:
ExperimentalDiscountsMeta
This slot renders above the Shipping section on the Cart block.

The following code snippet is for demonstration purposes only and does not reflect the previous screenshot:
/**
 * External dependencies
 */
import { __ } from '@wordpress/i18n';
import { registerPlugin } from '@wordpress/plugins';
import { ExperimentalDiscountsMeta } from '@woocommerce/blocks-checkout';

const render = () => {
  return (
    <ExperimentalDiscountsMeta>
      <div class="wc-block-components-totals-wrapper">
        {
          __( 'You have 98683 coins to spend ...', 'YOUR-TEXTDOMAIN' )
        }
      </div>
    </ExperimentalDiscountsMeta>
  );
};

registerPlugin( 'slot-and-fill-examples', {
  render,
  scope: 'woocommerce-checkout',
} );
ExperimentalOrderLocalPickupPackages
This slot renders inside the Pickup Method section on the Checkout block.

The following code snippet is for demonstration purposes only and does not reflect the previous screenshot:
/**
 * External dependencies
 */
import { __ } from '@wordpress/i18n';
import { registerPlugin } from '@wordpress/plugins';
import { ExperimentalOrderLocalPickupPackages } from '@woocommerce/blocks-checkout';

const render = () => {
  return (
    <ExperimentalOrderLocalPickupPackages>
      <div>
        {
          __( 'By using our convenient local pickup option, you can come to our store and pick up your order. We will send you and email when your order is ready for pickup.', 'YOUR-TEXTDOMAIN' )
        }
      </div>
    </ExperimentalOrderLocalPickupPackages>
  );
};

registerPlugin( 'slot-and-fill-examples', {
  render,
  scope: 'woocommerce-checkout',
} );
ExperimentalOrderMeta
This slot renders below the Order Summary section and above the Proceed to Checkout button on the Cart block.

The following code snippet is for demonstration purposes only and does not reflect the previous screenshot:
/**
 * External dependencies
 */
import { __ } from '@wordpress/i18n';
import { registerPlugin } from '@wordpress/plugins';
import { ExperimentalOrderMeta } from '@woocommerce/blocks-checkout';

const render = () => {
  return (
    <ExperimentalOrderMeta>
      <div class="wc-block-components-totals-wrapper">
        {
          __( 'Yearly recurring total ...', 'YOUR-TEXTDOMAIN' )
        }
      </div>
    </ExperimentalOrderMeta>
  );
};

registerPlugin( 'slot-and-fill-examples', {
  render,
  scope: 'woocommerce-checkout',
} );
ExperimentalOrderShippingPackages
This slot renders inside the shipping step of Checkout and inside the shipping options in Cart.

The following code snippet is for demonstration purposes only and does not reflect the previous screenshot:
/**
 * External dependencies
 */
import { __ } from '@wordpress/i18n';
import { registerPlugin } from '@wordpress/plugins';
import { ExperimentalOrderShippingPackages } from '@woocommerce/blocks-checkout';

const render = () => {
  return (
    <ExperimentalOrderShippingPackages>
      <div>
        {
          __( 'Express Shipping', 'YOUR-TEXTDOMAIN' )
        }
      </div>
    </ExperimentalOrderShippingPackages>
  );
};

registerPlugin( 'slot-and-fill-examples', {
  render,
  scope: 'woocommerce-checkout',
} );
Exposing Your Data in the Store API
ExtendRestApi
When you are extending the Cart and Checkout blocks, you might need to access some custom, business-related logic. If you would rather not create your own endpoints, you can append your data to the WooCommerce Store API using ExtendRestApi.
ExtendRestApi offers the possibility to add contextual custom data to the wc/store/cart and wc/store/cart/items endpoints. The data, which will live under the extensions key, is namespaced to your plugin and protected from other plugins causing it to malfunction. The data is available on all Frontend filters and Slot and Fill for you to consume.
For information about handling GET and POST requests, see our GitHub documentation:
Next Stop: Modifying existing Cart and Checkout Block Fields
In our next article, we’ll tackle the modification of existing Cart and Checkout block fields, allowing you to manipulate certain values through the use of a Filter registry, similar to the traditional filter system in WordPress. See you there tomorrow!
In the meantime, if you have any questions during the integration process, our recommendation is to reach out on our GitHub Discussions section Q&A – Extension Integrations and Customizations or in the Community Slack #woocommerce-blocks-and-block-themes channel.
Leave a Reply