A large store's guide to enable HPOS on WooCommerce
Do you run a high-volume WooCommerce store? Are you about to embark on the task to enable High Performance Order Storage (HPOS) on said store? As we move more and more high-volume store to HPOS, we decided to document the guidelines for those of you who may be faced with this task.
Before you begin
- Intro to High-Performance Order Storage
- High-Performance Order Storage Upgrade Recipe Book
- High-Performance Order Storage: Backward Compatibility and Synchronization
- Intro to High-Performance Order Storage for non-devs
Phase 1: Test out HPOS on a local development system
If you have a local development setup for your site, you can try out HPOS on your development setup. Make sure that you have all plugins and any custom code enabled on this test site and that you're running their latest versions. The test environment should mimic your production site as much as possible.
At the very least, we suggest you focus on the following tests:
- Test checkout with every payment method.
- Test refunds for those checkouts.
- If you are using WooCommerce Subscriptions, check that subscriptions can be purchased and renewals come through.
- Any critical flows you've defined for your site.
You can repeat the tests with both synchronization enabled and disabled.
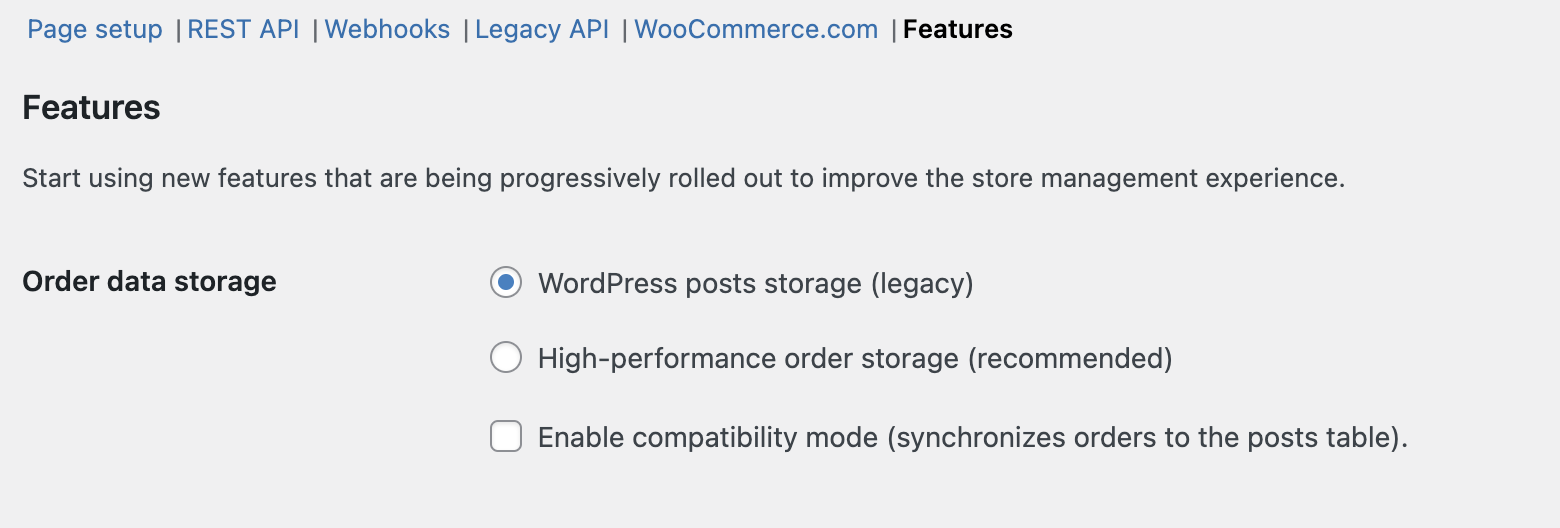
Remember that you can toggle synchronization by going to WooCommerce > Settings > Advanced > Features, and toggling the "Enable compatibility mode" checkbox.
Review: Phase 1 Checklist
- Make sure code on your test site is up to date by installing the latest versions of all WooCommerce-related plugins you're running.
- Test checkout functionality for every payment method.
- Verify refund process for test checkouts.
- If WooCommerce Subscriptions is installed, test subscription purchases and renewal.
- Test critical site flows with synchronization both enabled and disabled.
Phase 2: Migrations and testing on a staging site
When you're happy with how things are working in your local environment, it is time to copy over your production database to the staging site and test out HPOS migrations. For large sites, we recommend setting synchronization to on but, instead of relying on the scheduled jobs to perform the migration, you can speed things up by using the CLI: specifically, the command wp wc hpos sync.
To get a sense of how much the final migration (on production) is going to take, make sure to time how much it takes for this command to run. For example, for our test store of 9 million orders, this took about a week to complete.
For extra peace of mind, you can run wp wc hpos verify_cot_data --verbose to check that the data has migrated successfully.
Once migration is complete on your staging site, and still with synchronization enabled, re-run the tests defined in Phase 1. Disable the sync, and go through all testing again.
Test out 3rd party and external systems
You may have non-PHP systems directly connected to DB that would escape a normal code audit. Verify that if you have systems such as data warehouses, shipping tracking systems, accounting systems, etc., they are not reading the posts tables directly. If they are, then they would need to be updated before you can proceed with the next steps.
Review: Phase 2 Checklist
- Make sure the code on your staging site is up to date by installing the latest versions of all WooCommerce-related plugins you're running.
- Migrate production database to staging site using CLI.
- Monitor migration time for insights into production migration duration.
- Test Phase 1 flows on the staging site with synchronization on.
- Optionally, verify data migration integrity using
wp wc hpos verify_cot_data --verbose. - Test Phase 1 flows on the staging site with synchronization off.
- Audit third-party systems to ensure they do not directly access posts tables.
Phase 3: Enabling HPOS on production
If you are happy with testing on your local setup and staging site, it's time to start working on enabling HPOS in production.
Enable synchronization, keeping posts authoritative
Just like in the previous phases, you'll want to enable synchronization while still using the WordPress posts storage as order storage. As usual, do this by going to WooCommerce > Settings > Advanced > Features and making sure that Use the WordPress posts tables is selected as the order data storage.
This will make sure that orders will start appearing in the HPOS tables, and that existing orders will stay up to date.
Migrate and verify data
Now, start the migration by enabling synchronization by toggling on the "Enable compatibility mode" checkbox.
Right after enabling synchronization, you can start migrating past orders from the post tables to the new HPOS tables via CLI using the wp wc hpos sync command.
In case you see any errors, turning off the sync, or interrupting the sync CLI job is considered safe. You can resume once you have resolved the error (or if the error was unrelated to the sync process).
Optionally, you can also run the verify command (wp wc hpos verify_cot_data --verbose) to check that data migrated is as expected.
Important: Even if the CLI job has completed, don't turn off synchronization just yet. For a production site, we recommend disabling sync progressively: disabling sync on read and then fully disabling sync.
Also, we didn't see a noticeable negative performance impact when keeping synchronization enabled (with posts authoritative) during our recent high-volume store migration.
Switch to HPOS as authoritative
It's time to switch to HPOS. Go to WooCommerce > Settings > Advanced > Features and set HPOS to be authoritative (select "Use the WooCommerce orders tables").
As mentioned above, don't turn off synchronization yet. If there are any issues, the system can be instantaneously reverted to the posts table, resulting in no downtime.
Revisit all your critical flows from the previous phases and run some tests. Make sure to test checkout with various payment methods and your critical flows. On a high-volume store you should probably see some orders coming in naturally too, so open a few of those orders and verify that all the order data is being populated as expected. Keep an eye on your support or contact channels as well.
Tip: If your store has a natural low volume period then we'd recommend making the switch then, but you should plan to be online for some time after. Both switching to HPOS or reverting to posts (if needed) are hot migrations, and do not require any planned downtime.
Switch off sync on the read
In the previous steps you have enabled HPOS with sync on, now it's time to disable synchronization progressively in order to start seeing most of the benefits from HPOS. The first step in this process would be to disable sync on read, which you can do via the following snippet:
add_filter( 'woocommerce_hpos_enable_sync_on_read', '__return_false' );
We disable sync on read first because it demands more resources. If your site is running as expected, and you see some orders coming in, you can disable sync on read. We disabled this on our high-volume store migration after just 6 hours of setting HPOS to authoritative.
Switch off sync on write
If everything is working as expected, you can disable sync on write as well. Given sync on read was already disabled, you can disable sync altogether from the settings. As usual, go to WooCommerce > Settings > Advanced > Features, and uncheck "Enable compatibility mode".
On our high-volume site, we fully disabled sync after 1 week. We still run some manual synchronization (via wp wc hpos sync) periodically so that we have the opportunity to fall back to posts immediately should anything happen.
Keep in mind that disabling synchronization does not remove the ability to revert to the posts datastore, but you'd have to wait for the migration jobs to backfill the posts table with any data in the HPOS tables that they are missing. As always, wp wc hpos sync can also be used for this purpose.
Now with synchronization fully disabled, test out various critical flows, check that orders are coming in naturally as expected, and keep an eye on your support and contact channels.
Review: Phase 3 Checklist
- Plan to be online and monitoring your live site for a period of time.
- Enable synchronization with posts set as authoritative: in WooCommerce > Settings > Advanced > Features > select "Use the WordPress posts tables".
- Start migration via CLI using the
wp wc hpos synccommand. - Monitor for errors during migration; halt or resume as necessary.
- Verify migrated data integrity using the verify command
wp wc hpos verify_cot_data. - Enable synchronization with HPOS set as authoritative: in WooCommerce > Settings > Advanced > Features > select "Use the WooCommerce orders tables".
- Test all critical flows, perform checkouts with multiple payment methods, and verify order data accuracy.
- Monitor support tickets for any issues.
- Disable synchronization on read using the provided snippet:
add_filter( 'woocommerce_hpos_enable_sync_on_read', '__return_false' ); - Monitor site performance.
- After one week of stable operation, fully disable sync.
- Continuously monitor site performance, order processing, and support tickets.
General guidelines
- Keep test environments as close to the production setup as possible.
- Document any issues encountered during testing and migration.
- Regularly communicate with stakeholders regarding testing progress and outcomes.
- Plan for potential fallback scenarios, ensuring the ability to revert to posts if issues arise.